
Microsoft Teams and teaching
- Amanda Sterner

- Mar 31, 2020
- 6 min read
Updated: May 2, 2022
Last week I talked to my younger brother who’s in high school who had been thrown into Microsoft Teams from zero to 100%, I helped him with his first visit by sending a fun giphy #bestsister. Unrelated to that a friend of mine said you need to write a blog post with the most common problems teachers are having in Microsoft Teams and she sent me a list from her mom.

In this blog post I’d like to help you with some of the difficulties teachers might have when starting to use Microsoft Teams for teaching. I’d also like to add two nice things!
I the scenarios below I’m scheduling the meetings in a channel in a team. There are several pros with scheduling the meetings in a channel in a team, but my favourite reason is:
Keep the history in one place, make it easy to see what we did. Both for newly added students and for the ones already there
Note that my two nice things I’ll talk about don’t apply to people who just participated a meeting and doesn’t have user account.
Problem 1 – Students are disturbing during lessons by sharing their screen when they shouldn’t
The first problem I’d like to address are people doing what they can just because they can. The solution for this is meeting roles.
As a standard all participants in a Microsoft Teams meeting has the same roles which can cause problems. In a meeting in Microsoft Teams (this do not apply to live events) there are two different roles:
Presenter
Attendee
To change the settings who should be a presenter and who should be an attendee I find it fastest to open the meeting from the calendar in Microsoft Teams.

When opening the meeting you’ll see all details such as if the meeting is a recurrence and name of the meeting. To change roles, you click Meeting option

You can also reach these settings from Outlook, in the bottom of the calendar invite you’ll find the same button.

When you click it, a window will open in your browser. There you have the option to adjust the settings for the lobby and who will be a presenter. I’ll skip the lobby talk for now 😉.

By picking Only my, you will be the only presenter in the meeting and the students can’t present their screen during the meeting. The people who aren’t presenter will automatically be an attendee.

When the student is in the meeting the meeting settings will look like this, with the sharing option greyed out. But don’t worry they can still talk and share video.

At the moment it’s not possible to pick specific people to be presenters in the meeting settings, but if a student should share their screen you can click … on the person’s name during the meeting and make them a presenter.

Problem 2 – Students are muting me and other when they shouldn’t
This problem is closely related to the one above and the fantastic solution from keeping your student from muting you and others is once again meeting roles! As an attendee you can’t mute other in the meeting, only pin them 🙌🏻.

But this doesn’t stop your students form unmuting themselves and talk. Then it’s nice that you, as a presenter, still can mute them by clicking … and Mute participant

If you want it extra fast, you can choose to mute all participants in one click as well!

Problem 3 – Me and my students are having issues with devices
The last problem I’d like to address is what you can do when you or your students have issues with your devices (headphones, microphone or camera).
First step is to make sure it’s free from issues even before your start the meeting. In the screen before you enter the meeting in the lower right corner there will be a cogwheel. It will either say Devices or the name of your device.
Clicking that will show you the device settings, making it easy to have a look before you start and making sure everything is set up correctly. You could even make a test call to make sure everything is connected.

If you missed doing this before entering the meeting you can click … and Show device settings anytime during the meeting.

I’m not a sounds snob (nothing even close to it), but I’ve noticed the sound is a lot better using a headset – even a cheap one.
✨✨✨
I also want to add a few positive things as well, as using Microsoft Teams for teaching isn’t all bad. Here are two things that are really nice with Microsoft Teams!
A thing much better with Microsoft Teams 1 – I want my students to be able to watch my lesson afterwards
A big perk Microsoft Teams gives us is the option to record meetings, this enables people who missed the lesson to have a look after and also enables people to watch again if they want to repeat the lesson.
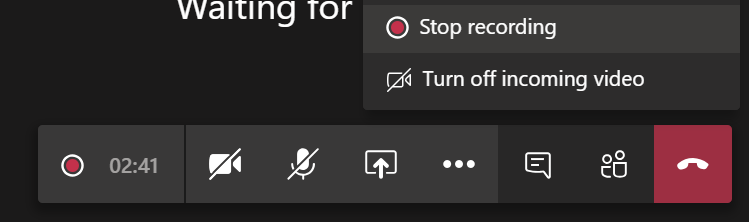
During the meeting you click … and Start recording to start recording. This will record what you say and share.

When you’re done you click … and Stop recording. The video will be saved in Stream, here’s a link to the Microsoft help centre from Stream but for this purpose I don’t think a deeper dive of Stream is necessary 😊.
So, you had the lesson, did the recording and waiting for it to be done. When the recording is done, you’ll get an email about that.
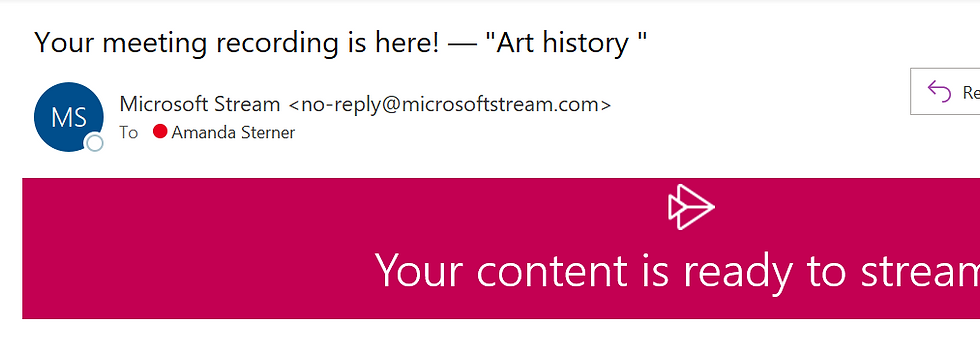
But what I like about having meetings in a channel in a team is that the meeting will appear as a conversation in the posts tab. And in that conversation, you’ll see the recordings (and can also watch them). And if you’ve recorded more lessons in the same meeting occurrence you will see all of the videos in the same conversation. Fantastic!

You could even add a specific recording as a tab if you really want everyone to watch the recording! Here I've written more about tabs.

But don’t forget that guest users can’t watch the videos.
A thing much better with Microsoft Teams 2 – An online whiteboard that’s being saved
The other perk I’d like to show you is Microsoft Whiteboard! I feel pretty confident in saying all teachers have used a whiteboard at least one time. But as long as you don’t have a private classroom and no other lessons in between the whiteboard will be wiped after each lesson. As best you can take a picture of it 🙁. Let me introduce Microsoft Whiteboard. I’ll show you how to do it in a meeting.
To add a whiteboard you share your screen, scroll to the furthest right a pick Microsoft Whiteboard.

My best tip is to open the whiteboard in the app as the whiteboard inside Microsoft Teams doesn’t have the same functionality. This will still display the whiteboard for th people in the meeting, but give you all the functionality of the app. I will not tell you everything you can do in Microsoft Whiteboard, here’s an old blog post written when Microsoft Whiteboard was in preview (and hopefully I can write a new blog post soon).

But you can draw, write both with your pen and keyboard, insert post-its, image, there are templates now in preview e.g. so a lot to do😍.

During the class your student can either look at the screen or be in the Whiteboard app directly but note that the standard setting is that everyone can contribute to the whiteboard. You are supposed to be able to change the settings so people only can view, but I can’t make it work. If you really need to keep your students from adding things in the whiteboard you could create a new whiteboard from the app, not share it but share your screen when you use the whiteboard. To share it afterwards you can export the whiteboard as an image.
Open the app, click on the settings menu.

Click Export.

Pick format.

And the whiteboard will be saved as an image you can share with the class afterwards 😊.
After the meeting is done you can either reach the whiteboard through opening the meeting in Microsoft Teams and clicking Whiteboard in the menu.

Or opening the whiteboard in the Microsoft Whiteboard app or from office.com.

Two less nice things I’ve noticed is that it seems like only the people who actually took part in the meeting will get access to the whiteboard. What you could do is to create a sharing link and add in the meeting conversation afterwards. You share a link by clicking the icon of a person+

You can invite person by person there, but I find it faster to create sharing link and share that instead. Once a person opens the sharing link, they will have access to the whiteboard.

Another thing I noticed after some testing it seems like you can only have one whiteboard per channel, regardless of how many different meetings you have in a channel. The good thing with that is that you can pick up where you left last time, the bad part is that you only have one whiteboard in easy reach from the meeting.
If you’d like to have different whiteboards in the same channel my suggestion is to create the whiteboard from the Whiteboard app and share it afterwards instead, just as you would share a link I mentioned above. Or just share your screen with the whiteboard and sending the finished one as an image after (as mentioned above).
Tricky at start, but once you get the hang of it, it’ll be worth it!


I found this blog while searching for information about Tiranga Club, and I'm really glad I did. The article explains Tiranga Club in a simple and natural way without making exaggerated claims. I had a few questions before reading, and your post answered them clearly. What I liked most was that the content felt genuine, like it was written by someone sharing real experience rather than just promoting something. Thanks for putting together such a helpful article. It's refreshing to find a blog that focuses on useful information and is easy to read. I'll definitely be back for more helpful posts.
I found this blog while searching for information about Tiranga Club, and I'm really glad I did. The article explains Tiranga Club in a simple and natural way without making exaggerated claims. I had a few questions before reading, and your post answered them clearly. What I liked most was that the content felt genuine, like it was written by someone sharing real experience rather than just promoting something. Thanks for putting together such a helpful article. It's refreshing to find a blog that focuses on useful information and is easy to read. I'll definitely be back for more helpful posts.
Microsoft Teams has made online teaching much more organized by bringing classes, assignments, and communication into one platform. It helps both teachers and students stay connected and collaborate efficiently. I've found that using the right tools can really improve the learning experience. TechDust also shares useful insights on educational technology and productivity that are worth exploring.
Teams can be a pain, but these meeting roles really help. Less chaos, more control—like with the sharing options. For quick ideas on squeezing more out of creative projects, check out this https://www.pixelbeads.io/.
The practical tips for using Microsoft Teams in teaching really highlight how the right digital tools can make lessons more engaging and organized. It also reminds us that having a reliable Hyperbaric Chamber can make a difference in a completely different setting, where consistent equipment supports focused performance and recovery. Whether it's education or wellness, dependable tools often help people get better results with greater confidence.